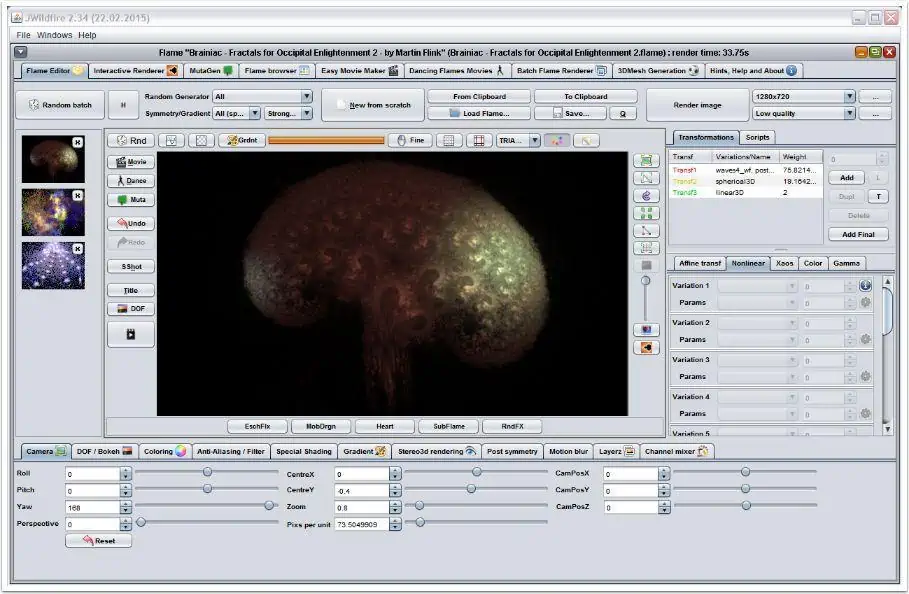
The Definitive Guide to Fractal Awesomeness with JWildFire!
The few simple steps needed to get started on your JWildfire journey…
(used with permission from JWildfire Wiki)
Checking Your Java version, Downloading and Installing Java
Getting Started with JWildfire Fractal ART and Animation Software.
Checking what version of Java you have installed.
In this section we’ll be taking you through the Installation of the Java Operating Environment Software (if you don’t have it, or need to update your current version).
Then we’ll help you download and install the Freeware Fractal Art and Animation software called JWildfire (JWF), created by Andreas Maschke.
By the time you finish reading through this part of the Manual…
We’ll take you by the hand and…
Very soon You’ll be able to create Stunning Images in a few minutes just by clicking a couple of buttons!
The best part is… You own the images you create and the copyright is yours… You could even sell your fractal images and make some money.
Don’t think that’s possible huh?
Fair enough, just read on and let us help you prove it to yourself…
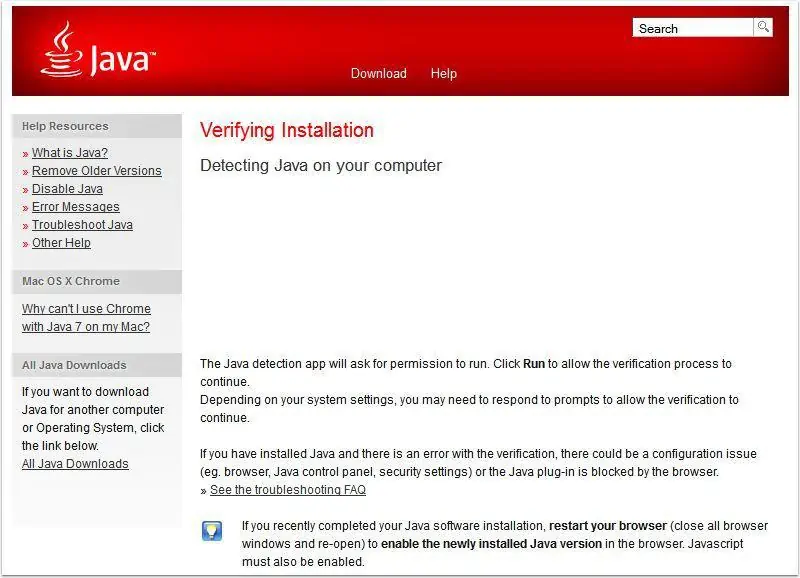
J-WildFire runs on Windows, Mac and Linux computers and require Java version 6, minimum, (preferably version 8 – currently) to be installed on your system. In this part of the manual we will be illustrating how to set up a Windows system. If you are on a Mac or Linux machine, further info can easily be obtained via Google for your platform, if you have any questions. To get started just go here: Check Your Java Version.
Upon arrival, the website will check if you have the latest version of Java installed and if not, get you the free download.
If you know you don’t yet have Java installed you can go here instead: Download Free Java Software.
If you have any problems with the automated check etc. or are on Solaris or Linux you can go here: Java Downloads for All Operating Systems.
For Mac users: Apple supplies their own version of Java. Use the Software Update feature (available on the Apple menu) to check that you have the most up-to-date version of Java for your Mac.
.
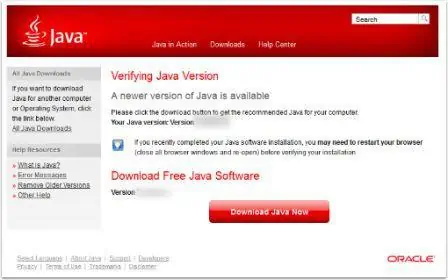
Download Java
If you haven’t got the latest version installed you’ll get a message like this.
Click on “Download Java Now”.
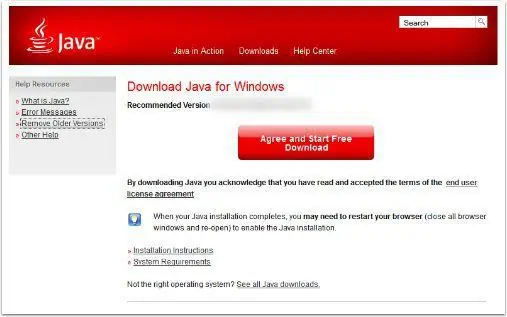
That brings you to the Download Page…
Click on: “Agree and Start your Free Download”.
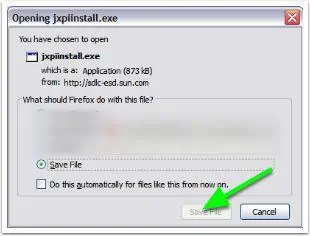
Click on Save File…
Save the file somewhere suitable on your system… this could be on your desktop or wherever you like.
.
Running the Installer.
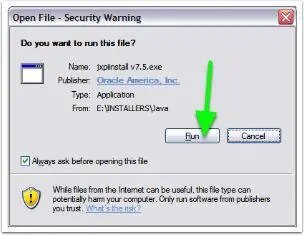
Once you have finished downloading, just Double click on the downloaded file in the Download Manager window, or where you normally save download files.
You may have to Confirm that you want to “Run” the installer in order to start the installation. Then follow the instructions to Install.
NOTE: You may need to restart (close and re-open) your browser to enable the Java installation in your browser. (Once installed, Java runs both “Stand Alone” and in your Browser when needed).
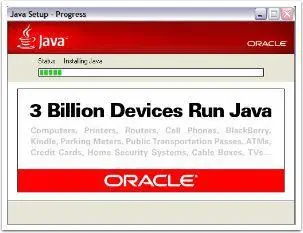
The Setup Progress will display… Followed by a Success Message when finished.
This process will not take more than a couple of minutes.
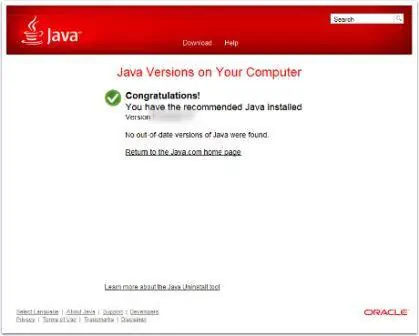
Verify that everything is working fine…
This step isn’t strictly necessary but I’m including the link for this in any case… just in case you have any problems.
Also, since the process only takes a couple of seconds, you might as well do it just to make sure!
If you have any problems there are also some helpful links on that page.
.
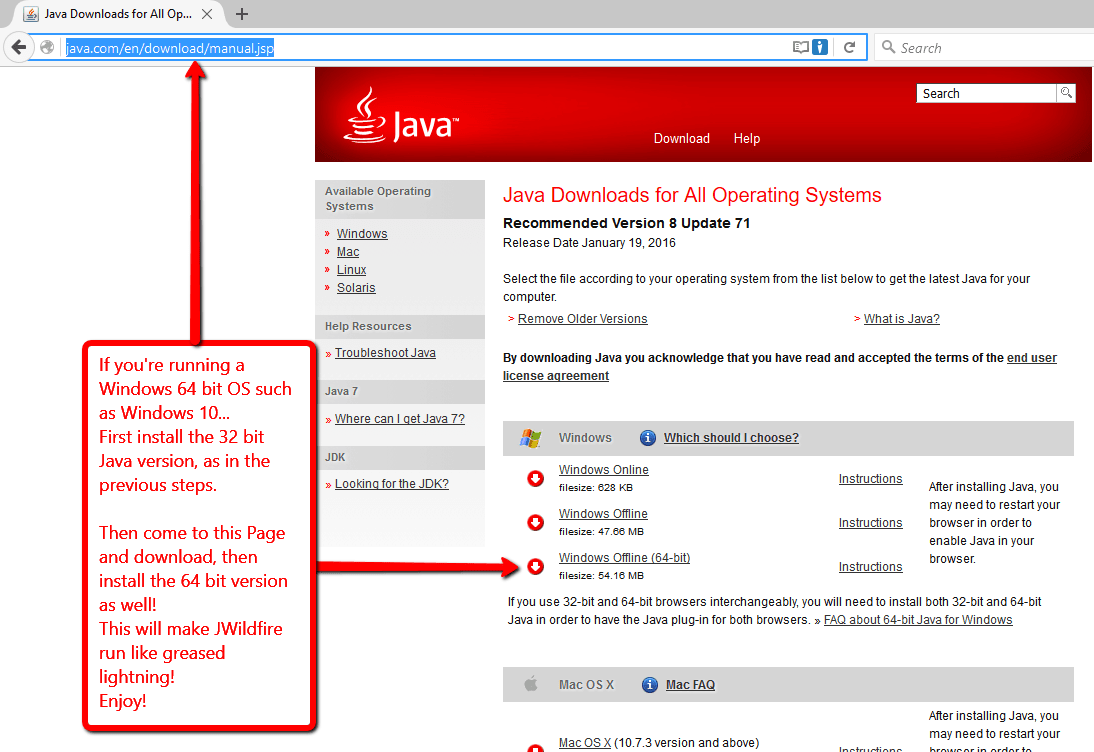
Optional but IMPORTANT!
IF you are running a 64 bit version of Windows (e.g. Windows 10) you must also download and install the 64 bit version of Java on your PC! JWildfire will need this to run in 64 bit mode (huge speed difference etc.).
You still need the 32 bit version in order to stay compatible with 32 bit applications (e.g. certain browsers etc.), so you do need both versions of Java.
The Link to download this or Java for other Operating systems and hardware such as a Mac is here:
Java Downloads for All Operating Systems
.
That’s It! Time to Install JWildfire
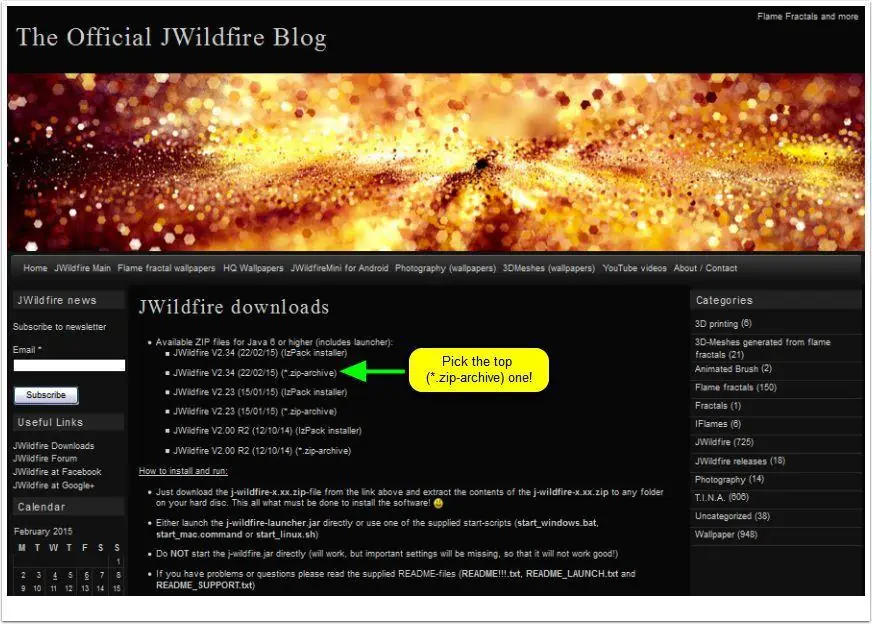
Downloading and Installing JWildfire
How to Download and Install JWildFire
Now it’s time to Download and Install JWildFire… This is very simple…
Future updates are also easy to install by following the same download instructions!
Go to Andreas Maschke’s Blog: JWildfire Downloads
To download, just click on the correct link and Save the file to a suitable location on your Hard Disk.
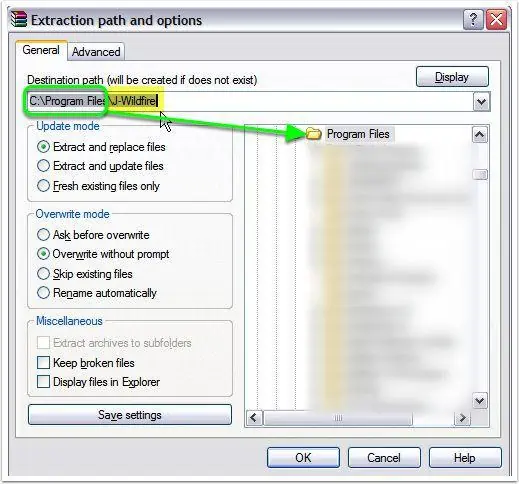
Unzipping the Zip file.
When you unzip the archive you can just direct the files and folders to be created in a suitable folder on your system (or you can Unzip to a temporary directory and copy/move the files from there afterwards).
Below we’re showing you how you can Navigate to for example: “C:Program Files” and by adding a suitable folder name like “J-Wildfire” (note the “” before the name of the folder I want to create and install the files in), to the end of the “Destination path”, we’re asking the Unzip program to create the folder called “J-Wildfire” for us and copy all files and folders into it.
You can call the JWildfire folder whatever you like and put it anywhere on your system.
Another option is to first Unzip the JWildfire software files to a separate “JWildfire downloads” folder, where you could keep the last few software updates (in separate folders) and other resources not directly needed to run the software. Once unzipped all you have to do is copy all files and folders from inside the newly created folder for the version you just unzipped. Then paste these files into a suitable program folder which you can create yourself… then follow along below. (This is also a very good way to apply upgrades to the software. – Note that you would have to answer “Yes” when the move/copy or unzip function asks you to confirm overwriting of old files with the same names in your JWildfire program folder).
.
The J-Wildfire folder is created and files copied into it.
Once the files have been unzipped (a few seconds later) we’re nearly done!
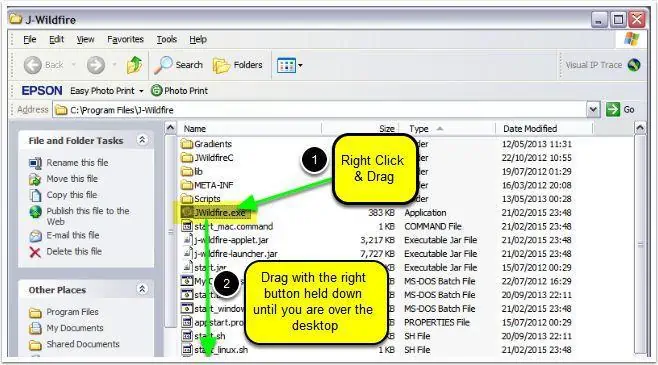
Since the software is not installed in a traditional way (no long winded installation routine)… there is no Start up Icon created on your Desktop! So we’ll create a shortcut to the “JWildfire.exe” file and put that on the desktop. (The file is of the type “Application”).
N.B. If your system is set up to “Hide file extensions” the file will only show up as “JWildfire” since the file extension “.exe” will be hidden!
This process may be a bit different if you are using a non-Windows system! Please refer to google or your system manuals if you don’t know how to get this done.
Open your “File Manager”, “My Computer” or “Explorer” and Navigate to the Folder you just created.
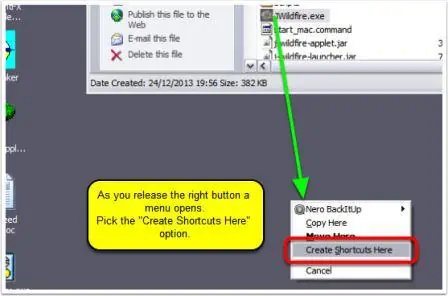
To create an Application Shortcut to JWildfire, begin by Right Click and Dragging the “JWildfire.exe” file (don’t let go of the Right Mouse Button!)… Then Drag the icon of the file out of the File Manager onto the Desktop…
Creating the Shortcut.
When you have dragged the “JWildfire.exe” icon to a suitable location… Let go of the Right Mouse Button!
Select the “Create Shortcuts Here” option.
The new Shortcut is ready!
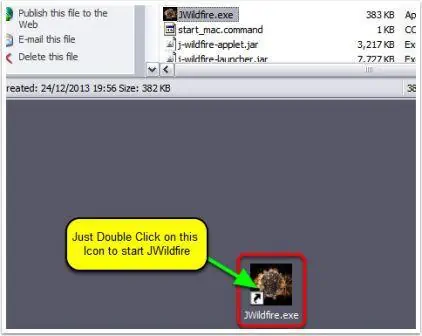
Using The Shortcut.
Now you have created a shortcut to the “JWildfire.exe” file. This will be the icon we use to start the software.
The “JWildfire.exe” icon is linked to the executable JWildfire Launcher and will start up the software when double clicked.
So instead of having to go to the folder and double clicking on this program file every time we want to start the software, we have just created a “Shortcut” on the desktop that provides a direct link to the file instead.
Ta da!
We’re ready to go have some serious FUN!
There you go… we’re done messing about now…
It’s time to go and find out how you can become a Serious Artist with just a couple of clicks!
Double Click on the Icon you just created to start up JWildfire…
.
Launching JWildfire
What you’ll see when JWildFire starts
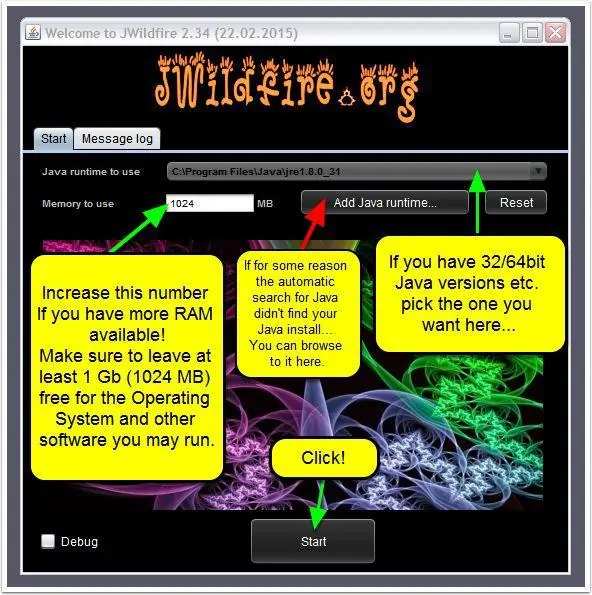
The first thing you’ll notice when you start JWildFire is the initial “Welcome to JWildfire” (version No. and compiled date) window opening up…
This contains the Java Environment startup options, with a couple of optional settings.. JWildfire is just as happy working in 32bit mode as 64bit (optimal if your OS supports it).
When you are happy with your settings click on “Start”!
Shortly after this window disappears, you’ll see the main “Welcome to JWildfire” window open with the main JWildFire interface behind it…


For linux/unix users, there are few other steps as windows.
Once the tar.gz file downloaded, extract it. Once extracted, you must have a folder with a name such as “jre1.8.0_172”.
On debian and ubuntu like operating systems, this folder must be in the following path : /usr/lib/jvm
The jvm folder is useful for any software that uses or needs the java runtime environment such as libreoffice/openoffice.
If you don’t know where is the path of your jvm or if you are not sure where it is (it may vary depending on the operating system), ask it in the terminal with the following command :
whereis jvm
and you should have an answer like, jvm: /usr/lib/jvm
In the same terminal, grant root admin privileges : sudo for ubuntu, su for debian. Put your password. If the process succeeds, you may have # instead of $ in the terminal. This # says that you have root privileges.
As you know the path of your jvm, and you know the path of the jre folder, you have to type the following command line to move the jre folder to the jvm folder :
mv /path/to/the/jre1.8.0_172 /usr/lib/jvm
mv = move. Consider each expression as a word, so between them put a space mv is a word, /path/to/the… is also a word, etc.
Thank you very much, I think I’ll add that to the main bulk of the text if you’re ok with that ?
This is what I needed to install Java 10 in the JWF 3.50. I did not know the step to open bin. Thank you so much.
You’re most welcome Joy, glad you got it sorted.
I installed the latest windows Java (release 1.8.0_191). I then installed Jwildfire 3.50. When I launch (both from the file folder and the short cut icon on the desktop – the start page comes up. It shows the latest Java version. I then press start and the page disappears. Next, I check the debug box – run it again – it disappears and then I bring it up again and check the messages log. It says “No JRE found in “/C:/Users/spddesktop/Documents/jwildfire/j-wildfire-3.50/j-wildfire-launcher.jar”.
I thought – maybe I need to reselect the java version – so I do the add java thing – go to my c: drive java folder, look in the BIN directory and click on java.exe – that works. Then I try starting again and the page disappears again (and no app shows the Windows Task Manager.
What am I doing wrong? Thanks Scott
This is just a guess Scott, but you might need to remove previous versions of Java that might be causing a conflict.
If you already have, let me know and we’ll see what’s going on, but if not, try this link for the remove tool.
https://www.java.com/en/download/faq/remove_olderversions.xml
Thanks thoth – I ran the Java Uninstall tool and the results were “There is only one up-to-date Java version detected. Are you sure you want to continue?”
I did not continue (grin).
Just for fun, I rebooted. Turned on debug and hit the start button – the start button turned white and is just sitting there. The message log is saying “Attempting to launch JWildfire using the command:
cmd /start /low /b “JWildfire” and then the file location.
Can you screenshot me a pic of before you hit the start button? Also are there any entries in the Message Log tab on the start screen?
Sent to in a public message to your! Thanks!
I took a chance and fired up the JWildfire 3.0 module with the 64 bit java and it worked! I’ll muddle on with this for a bit. Thanks!
I wonder if that’s the problem overall, certainly as I experienced, using the 32 bit version soon bombed my JWF 3.5 with a memory error. 64 bit solved it. 🙂
I couldn’t tell you what the issues is, but I did manually download and install the 64 bit Java (thanks) and it’s working with JWF 3.0.